Plant growth is a very natural thing. We must respect nature; however, we will always continue to try to extend the borders and explore new ways to improve quality, production and growth control. This is also why every grower has their own specific techniques. We have provided some standard techniques here, which have proved themselves over time.

Positioning & moistening the substrate
Maximise the substrates potential volume by following these simple start-up tips.
Position the slocks or slabs on a slight slope
The ground under the slabs must be on a flat surface (growing gutters) with a slight slope. This allows the slab to drain quickly and easily.
Fully saturate the substrate before initial use
To create the optimum air-water ratio during growth, it is essential to initially soak new substrates in a proper nutrient solution. If the substrate is not completely saturated to begin with, you are not maximizing its full potential volume.
It is recommended to soak Multigrow cubes, plugs and slabs in water with a pH of approximately 5.5 plus a nutrient solution. Use a pH down solution and a fertilizer designed for the crops you are growing.
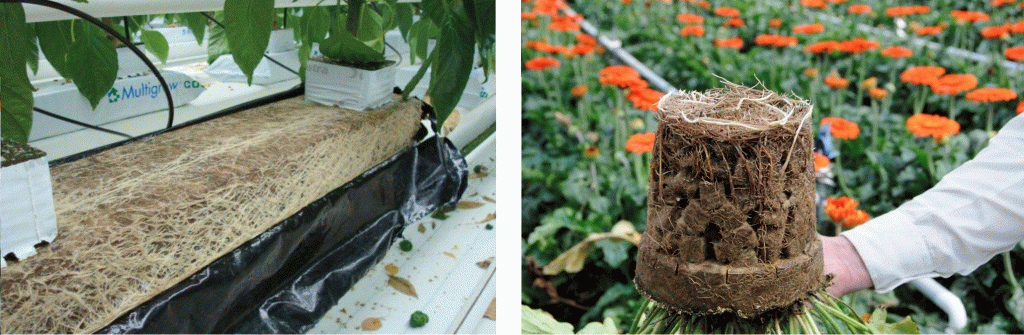
Drainage slits for Multigrow slabs
Good drainage slits in polythene wrap are vital since the excess water must be able to drain freely from the slab. Be sure to get this job done properly from the beginning!
Drainage slit positioning
- Make sure you cut the slits in the slabs before planting!
- The best position for these slits is between the plants and at the lowest point of the slab. Work vertically from the bottom up.
- Vertical Drain Slits must be at least 3 cm Long
- Horizontal Drain Slits (for roses) must be 5 – 7 cm Long and every 25-50 cm
- Try to make the edges of the slits rough, this prevents them from re-sealing/clogging

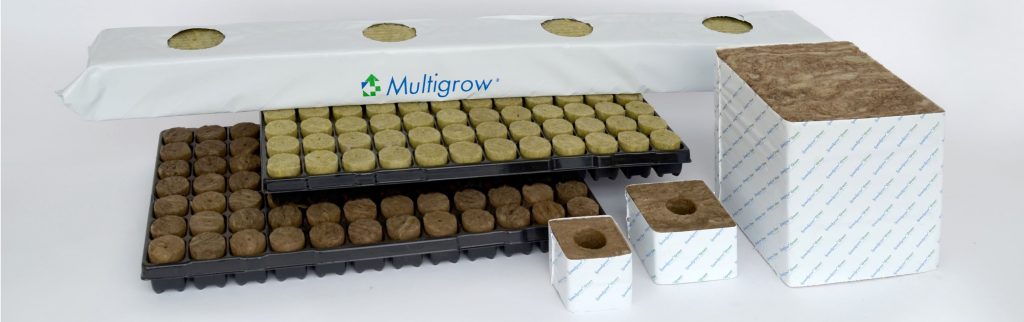
Multigrow plug trays techniques
Multigrow plug trays are an excellent way to get your plants and crops started.
Soak to fully saturate the plugs before initial use
Soak the plugs long enough until they become fully saturated.
Insert seeds or cuttings into Multigrow / Speedgrow plugs
Insert 1-2 seeds or one cutting per plug.
Create a proper growing environment
For optimal seedling growth, move plug tray to an area with medium light intensity and high humidity, such as under a clear dome with supplemental lighting.
Keep a balanced moisture level
Check regularly for any plugs that are beginning to dry and mist or irrigate lightly. Continue to monitor and irrigate as needed while plants grow. Avoid allowing plugs to remain soaking wet.
Fertilize according to the crop you are growing
Fertilize with a low concentration of appropriate fertilizer based on the crop. A higher concentration can be used as the plant grows larger.
Transplant the Multigrow plug into a larger cube or block
Once the plant is well grown and is fully rooted in the plug, it is time to transplant! Insert the plug into a Multigrow cube or transplant in a larger pot or your garden.
Growing Techniques
Some tips and techniques to get you growing strong and healthy plants
Watering an established plant
As soon as the roots have penetrated well into the slab or big cube, the watering should be adjusted bearing in mind the following:
- Check the quantity of drain on a regular basis (20-40% depending on the crop)
- Start watering when transpiration has started
- Stop watering at least 2-4 hours before sunset – On grey days (low light levels) even earlier.
- The time to stop and amount of water is dependent on the weather, crop and irrigation strategy.
Check moisture level and irrigation frequently
Check regularly for any cubes that are beginning to dry and need more water. Irrigation can be done by hand watering, emitters or flood irrigation. Continue to monitor and irrigate with appropriate nutrient solution as needed while plants grow.
Place Multigrow cubes under bright light
Proper light levels are required for healthy and strong plants. Be sure to use the appropriate lighting system for the type of crop you are growing.
Create a system from starting Multigrow plug trays to finish in the Multigrow / Speedgrow slabs
- The Multigrow 38 mm plugs are designed to transition smoothly into the Multigrow starter cubes or big cubes and then into the Multigrow slab.
- Insert the plug or cube into the hole on top of your Multigrow cube or slab and tamp in lightly. Do not push the plug all the way into the edge but leave about a 1 cm to stick out.
- When placing Multigrow cubes on big cubes or slabs they should be watered frequently to assure a good start to rooting. This allows for the roots to expand from the cube into the big cube or slab.
Transplanting onto a slab or growing block
When the plant is fully established you are able to transplant simply by placing the Multigrow cube on a slab or growing block.

Watering Techniques
After a period of controlling the crop, it is important to keep enough strength for growth, both of the plant and its fruit and flowers. From this period, it is important to give enough water to achieve the desired drain. The total amount of drain (per day) must be between 20 and 40% (depending on the crop). To change the water content and EC level of the slab, the following water techniques can be used.
Higher water content
- Watering with a higher frequency
- Start watering earlier in the day
- Stop watering later in the day
- Night watering in shifts
Lower water content
- Watering with a lower frequency and longer intervals
- Start watering later in the day
- Stop watering earlier in the day
- No watering at night
Higher EC (electro conductivity / salt content)
- Higher EC (fertilizer) input
- Smaller shifts and intervals
- Less drain
Lower EC (electro conductivity / salt content)
- Lower EC (fertilizer) input
- Larger shifts and intervals
- More Drain
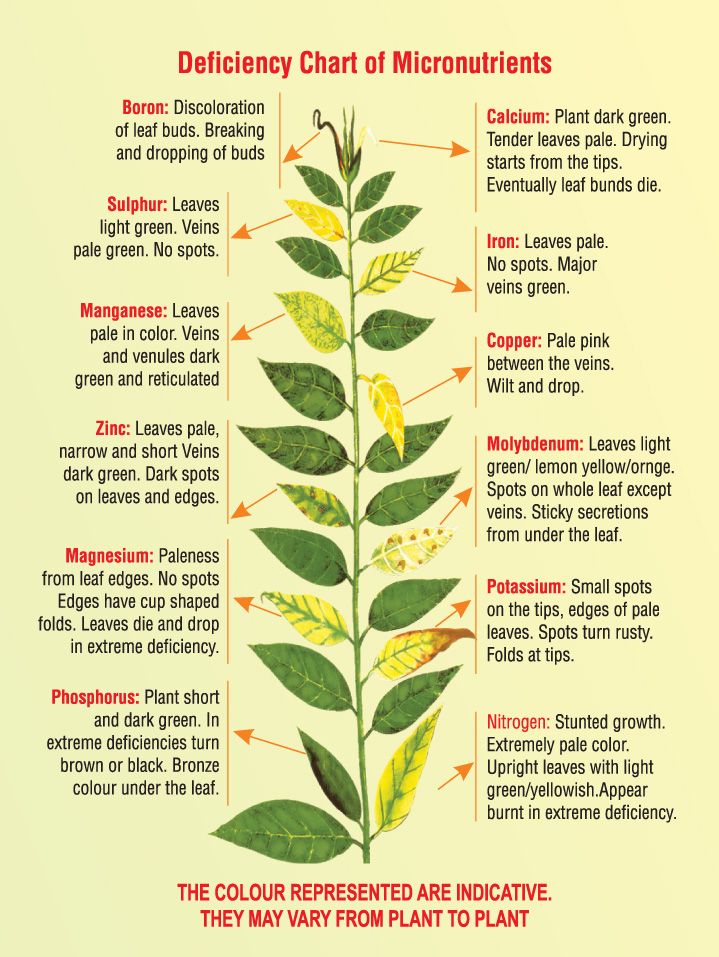
Nutrient Deficiency Symptoms
If mineral elements are not present in the medium in quantities sufficient for plant growth, plants exhibit nutrient deficiency symptoms. Anything that interferes with the active absorption of nutrient ions by the root system-eg. unfavourable pH levels, or media temperatures significantly above or below optimum (15-25 degrees ) may also result in similar symptoms. Root injury caused by root rots, water logging and inadequate aeration. Below a description of some visible deficiency symptoms of the different essential mineral elements.
Nitrogen
Nitrogen deficiencies are rarely seen in a commercial grown gerbera plant. However, it can occur when growing media with low cation exchange capacities are used and over watering occurs. Nitrogen deficiency shows as a general overall yellowing or chlorosis, starting on the oldest leaves and then moving gradually upward. The progression of the chlorosis is from yellow-green to yellow to a creamy white. Because nitrogen is translocated out of the older leaves to the new growth under deficiency conditions, the youngest leaves rarely show any significant yellowing.
Potassium
Potassium deficiency first begins as a rusty brown, marginal necrosis of the older leaves. The centres of the leaf blades usually remain green, although some necrotic spots might occur. Severely affected leaf margins usually curl upward.
Phosphorus
Symptoms begin as a gradual brownish discoloration on the underside of older leaves, especially along the veins. Phosphorus deficiency symptoms usually occur during winter when soil temperatures are cold, and disappear when warmer weather returns.
Calcium
Calcium deficiency appears initially as death of the apical meristems (growing points), and sometimes as an extreme yellowing of the young developing leaves. The young leaves remain small and yellow, with colour turning gradually to a whitish yellow or creamy white. Edges of leaves eventually die and turn brown.
Magnesium
Magnesium deficiency is common on gerberas, due to insufficient amounts of magnesium in the growing medium and the lack of magnesium in most fertilization programs. The symptoms appear on the older leaves as an interveinal chlorosis, with a persistent, inverted, V -shaped green area remaining at the leaf bases. A V-shaped green area also persist at the leaf terminal. Once symptoms develop, they cannot be reversed.
Iron
Iron deficiency symptoms occur as an interveinal chlorosis, primarily on the younger leaves. The veins and veinlets remain as thin green lines. Leaves become progressively smaller, and the chlorotic areas ultimately progress from yellow to creamy white. In the last stage, even the veins and veinlets become chlorotic.
Zinc
Zinc deficient younger leaves are splotchy and chlorotic in colour, but the definitive symptom is that one half of the leaf blade ceases to expand and develop, while the other half is normal in size and shape. This uneven development causes the leaf to bend into a “C” shape.
Molybdenum
This deficiency is most prevalent in strongly acid («pH 5) growing media. It’s displayed as strapped leaves, and the leaves become exceedingly narrow. Also the veins run parallel and overgrow at the margins to give ser- rated leaf edges.
Manganese
Manganese deficiency symptoms appear first on young leaves and are similar to those caused by iron deficiency, except that the persistent bands of green along veins and veinlets are broader, extending slightly out into the tissue to the leaf blade. The interveinal chlorosis is not as severe as with iron deficiency
About Multigrow / Speedgrow Rockwool
Multigrow rockwool have a wide range of plugs, cubes, blocks and slabs for propagation and cultivation of flowers and vegetables.
Multigrow and Speedgrow rockwool is produced by Benfried B.V. in the Netherlands and available through Roskam Pty Ltd in Australia.
Greenhouse consultancy
Roskam Pty Ltd is a company based in Melbourne, and specialises in greenhouse consultancy.
Job Roskam was raised on a gerbera flower farm in The Netherlands. Growing up in the Netherlands, Job gained specialist knowledge by attending several horticultural schools. Guidance from his father and several key figures in the Dutch horticultural industry helped him to become an expert in his field.

Please Note: The best possible information has been used to prepare the above information. The application of the information is beyond the control of Roskam Pty Ltd and no liability will be accepted for any loss or damage suffered as a result if using products or information listed in this list. It is essential to follow the legal requirements and the instructions on the label before using any crop protection product.